
Unlock Your Video's Potential: Discover the Secrets of Stunning Lighting Techniques!
The importance of lighting in video production cannot be overstated. Good lighting can transform an ordinary scene into something spectacular, enhancing the visual appeal and storytelling of your videos. Imagine capturing a breathtaking sunset with the right lighting setup that accentuates the warmth of the colors, or shooting an interview where the subject is illuminated perfectly, making every detail pop. This article will explore the significance of mastering lighting techniques, covering everything from the basics to advanced tips and tricks that can elevate your video shots. Whether you're a beginner or looking to refine your skills, you'll find valuable insights and techniques that will help you create stunning video lighting for perfect shots.
Understanding the Basics of Video Lighting
To create visually striking shots, it’s essential to understand the fundamental principles of video lighting. One of the foundational setups is the three-point lighting technique, which includes key light, fill light, and backlight. The key light is the primary source of illumination, while the fill light softens shadows created by the key light. The backlight adds depth by separating the subject from the background. Understanding color temperature is also crucial; it refers to the warmth or coolness of the light and can drastically alter the mood of your video. For instance, warm hues can evoke feelings of coziness, while cooler tones might create a more clinical or dramatic atmosphere. Additionally, shadows play a vital role in defining shapes and adding dimension. Mastering how these elements work together will set a strong foundation for your video lighting skills.
Types of Lighting Techniques
There are various lighting techniques used in video production, and knowing when to use each can significantly affect your results. Natural lighting utilizes sunlight, which can be incredibly flattering and is often free! However, it requires planning, especially to capture the golden hour—those magical moments just after sunrise or before sunset when the light is soft and golden. Artificial lighting, on the other hand, gives you more control over the environment and is ideal for indoor shoots. Common sources include key lights to provide the main illumination, fill lights to balance out shadows, and backlights to create depth. Mixed lighting combines both natural and artificial sources, but it’s essential to match color temperatures to maintain a cohesive look. Each technique has its advantages and can be effectively utilized depending on your specific shooting conditions.
Natural Lighting
Utilizing sunlight effectively can be a game-changer for your videos. The golden hour is the most sought-after time for filmmakers as it bathes subjects in a warm, flattering light. However, managing different weather conditions is crucial; overcast days can create soft shadows and even lighting, perfect for interviews or detailed shots. Remember to always consider the direction of the light, as it can drastically change the mood of your video. A friend of mine once shot an outdoor scene in the afternoon sun without considering the harsh shadows it created, leading to an unflattering outcome. Planning your shoots around natural light can save time and enhance the quality of your footage.
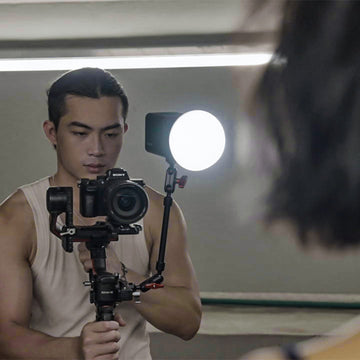
Artificial Lighting
Artificial lighting opens up a world of possibilities for videographers. Key lights are usually the most powerful source in your setup, providing the main illumination. Fill lights complement the key light, reducing harsh shadows and creating a balanced look. Backlights, positioned behind the subject, help to create separation and depth, giving your shot a professional touch. When using artificial lights, consider their intensity and color temperature to maintain a natural look. It's essential to experiment with different setups to find what works best for your style and the story you want to tell.
Tools and Equipment for Perfect Video Lighting
Equipping yourself with the right tools can significantly enhance your video lighting capabilities. Softboxes are great for diffusing harsh light, providing a soft and even illumination that flatters skin tones. LED panels are versatile and can be adjusted for brightness and color temperature, making them a favorite among videographers. Reflectors can bounce light onto your subject, filling in shadows without needing additional lights, while diffusers help to soften the intensity of direct light. When selecting equipment, consider portability, versatility, and how each tool fits into your shooting style. Investing in quality lighting tools can make a noticeable difference in the overall production value of your videos.
Common Mistakes and How to Avoid Them
Even seasoned videographers can fall into common lighting traps. One mistake is relying solely on the key light without considering fill and backlighting, which can create flat images. Another frequent pitfall is neglecting the color temperature, leading to inconsistent color tones in your footage. To avoid these mistakes, always do a test run before your actual shoot and adjust your lighting setup accordingly. Additionally, ensure that your lighting is soft and diffused to avoid harsh shadows that can distract from your subject. By being mindful of these common issues, you can troubleshoot your lighting setups and achieve better results.
Mastering Lighting for Enhanced Video Quality
In conclusion, mastering lighting techniques is crucial for any videographer looking to elevate their work. By understanding the basics, experimenting with different techniques, and utilizing the right tools, you can significantly enhance the quality of your video shots. Whether you choose natural or artificial lighting, the key is to practice and refine your skills continually. Embrace the art of lighting and unlock the full potential of your videos—your audience will thank you for it!